Geek Gifts – Morse Code Mug Rug Tutorial

My wonderful, techno-geek man and I have been together for twenty years. We don’t give each other big gifts, but I decided to make him a mug rug for his desk, as he often has his coffee and a sandwich or a snack while he’s working at the computer, or the radio, or reading (on an iPad, of course,)

G’s been absorbed in all things technical since he was a lad; and before there were computers and programming code there were radios and Morse Code. He’s used Morse off and on for more than 40 years. So, what better pattern for a mug rug for him?

Quilted Morse Code mug rug

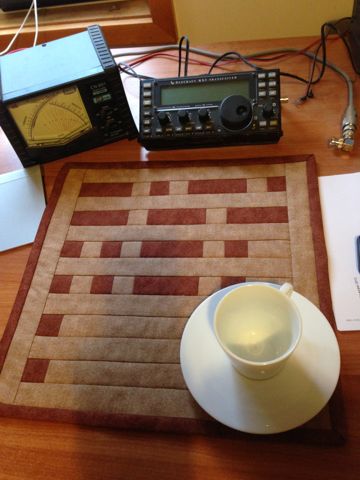
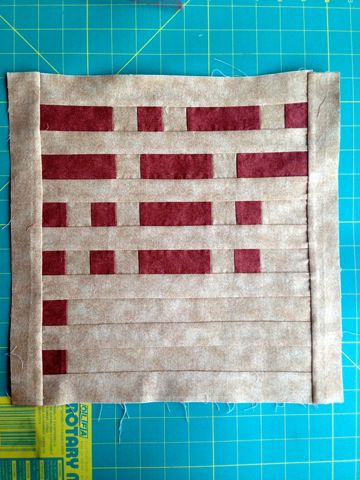
Each row of dots and dashes represents 1 letter in Morse Code; the six rows, starting from the top, read ‘coffee’ – it only took him a moment to realise it was Morse, and to read it!

If you’d like to make one for any of the geeks you love (or for your own inner geek!), here’s a step-by-step tutorial. Note that this is my first quilting tutorial, so I hope I’ve made it easy enough to follow! I’m assuming that you have some patchwork and quilting experience, so am not giving detailed instructions for standard steps like backing and quilting.


Finished size:

13.5 inches square (it’s a fairly large mug rug!)

Materials:

  • For top – 2 fat quarters, one light and one dark (I used two contrasting shades of brown, to complement the woodwork in DH’s study)
  • For backing – 16” x 16” piece of fabric
  • Batting – 15” x 15”

Cutting:

From dark fat quarter:

1 – 10.5” x 3.5” – then cut one piece 1.5” x 3.5” off this piece and hold to one side

2 – 1.5” x 7.5” – then cut one of these strips into 5 x 1.5” squares

3 – 2.5” x WOFQ – for binding

From light fat quarter:

First, cut 11 – 1.5” x WOFQ strips; then cut these as follows:

  •             2 – 13” lengths (side borders)
  •             7 – 11” lengths (sashing and top and bottom borders)
  •             1 – 10.5” length + 9” length
  •             1 – 10.5” length + 7.5” length

From the leftover strip ends, cut 2 2.5” x 1.5” lengths and 5 1.5” x 1.5” squares

(Note: if you are not using a fat quarter, and instead using a wider or full-width fabric, you will be able to cut fewer strips to get these lengths.)

Sewing

Steps 1 & 2

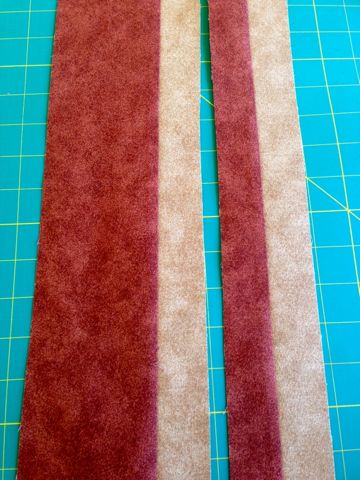
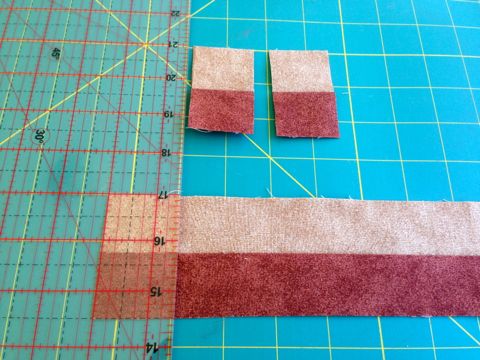
Sew the 3.5” x 9” dark strip to a 1.5” x 9” light strip, long sides together. Press seam.

Sew the 1.5” x 7.5” dark strip  to the 1.5” x 7.5”, long sides together. Press seam.

Your fabric strips will look like this – except shorter (I was trying to make 2 mug rugs at once!)

Fabric strips sewn together


Step 3

Measuring carefully, cut the wide strip into six 4.5” x 1.5” pieces. These will become the dashes.
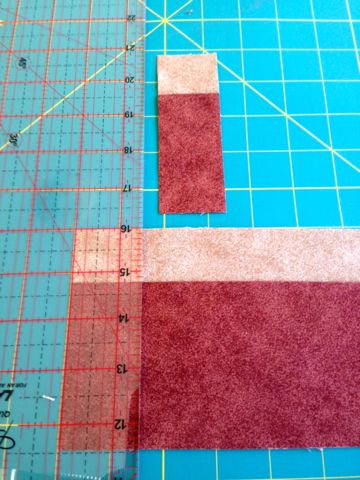
Cutting wide strips

Step 4

Cut the narrow two-coloured strip into five 2.5” x 1.5” pieces. These will become the dots.

Mug rug cutting strips

 Step 5

Using the below diagram as a guide, lay out the pieces for each row. Note that in the diagram, the darker colour dash and dots indicate the ones that don’t have a light square attached. For the dots and dashes with light squares attached, the light square should always be to the right of the dark square.

Morse Code Mug Rug diagram

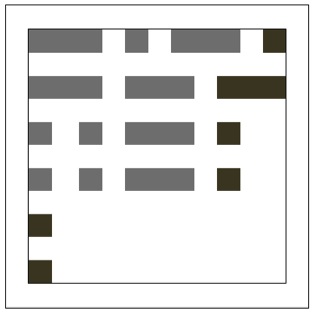
On the 3rd and 4th rows, add in the 2.5” light spacer strips at the end of the row; on the 5th and 6th rows, add in the 10.5” spacer strips to complete the rows.

20131127MugRugTutorial4

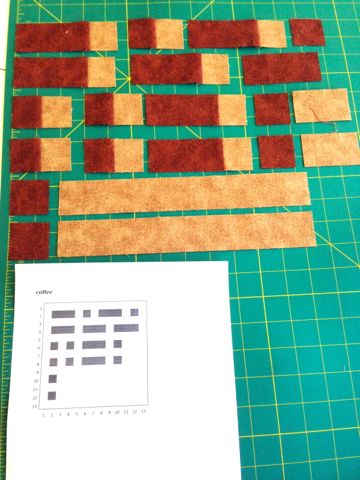
Now, do check and double check that you have all the pieces in the correct order!

Step 6

Sew the dots, dashes and spacers of each row together, making sure to keep the correct order. Press the seams.

Step 7

Now, lay out the rows of dots and dashes with the sashing strips between them:

Mug Rug tutorial: Completed strips in order

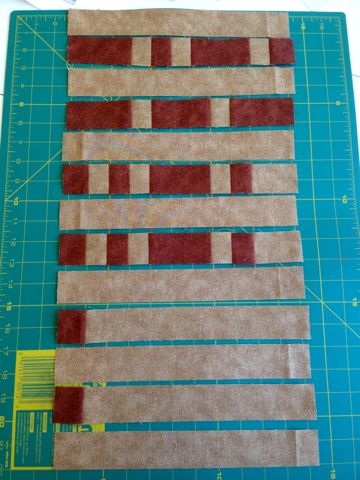
(They’re in the correct order, aren’t they, because you’ve checked, right?)

Step 8

Now, keeping the order correct, sew each letter row of dots and dashes to a row of sashing, then sew them together in order, with the top and bottom borders in place. (I pressed the seams towards the light sashing, because that gave less bulk at the joins of the dots and dashes.)

Step 9

Add the side borders and press your seams, and you have the completed mug rug top:

Completed mug rug top


Step 10

Now you can add your batting, backing and quilt. I used a cotton batting, and quilted it in straight, stitch-in-the-ditch lines along each of the seam lines.

Step 11

Once your quilting is done, press the mug rug again. Then trim off the excess backing and batting. Sew the 3 dark 2.5″ wide strips end-to-end, press them in half lengthwise, and use them to bind the mug rug, in whatever binding method you prefer.

Quilted Morse Code mug rug


Flood Relief Appeal

Queensland has certainly been doing it tough in the past couple of months. On top of the devastating floods across much of the state, the north had to contend with one of the biggest cyclones in living memory just this week – fortunately it made landfall in a more sparsely populated region, so although there has been significant property damage to homes, farms and businesses, the death and serious injury toll is low.

Thank you to everyone who purchased patterns during January – as I promised, all profits from my pattern sales have now been donated to the Queensland Premier’s Disaster Relief Appeal.

As I want this to be transparent, here’s the information about pattern sales, net income calculation, and donation:

notification of January pattern sales & Rav fees

$130.00 Income from pattern sales minus $5.00 Ravelry fees minus 8.25 Paypal fees (details in spreadsheet here)
= $116.75 Profit from pattern sales

I rounded that back up to $120.00 and made the donation this morning:

donation receipt

Thank you again to everyone who contributed! I wish I could do more, but my own financial situation has been somewhat tight lately, so I appreciate you all being part of a team effort to enable the donation!

More small achievements

I seem to be managing to cross a few things off my to do list lately – not huge things, but some little ones that nevertheless make me feel good! And those I haven’t yet crossed off, I’m making good progress on.

Since I’ll be in hospital for Christmas and won’t be able to visit my parents, I thought I’d knit another lace doily, this time in colours to match the blue and white linen my mother often uses on the table for Christmas dinner. I rummaged around in the stash and found a cone of pale blue cotton I’ve had for years, and cast on for the a second one of the Little Flower Doily (Rav link) from Bad Cat Designs. It took me a little over 24 hours to knit, and here she is blocking this morning:

Little Flower Doily blocking

So, I can be at Christmas dinner in spirit – or under a nice glass plate of Mum’s fruit mince tarts 🙂

The Christmas knitting – the small amount I am doing – seems reasonably under control. The Binary Cable Hat I started knitting for my nephew before his birthday in August didn’t get finished, as I confused myself with how to set the binary code for his name into the cables, and therefore stuffed it up. However, this morning I finally frogged most of what I’d done, back to the first inch, and have restarted again, getting it right this time! So, it’s now progressing well, and I hope to have it finished if not today, then tomorrow. I have another gift for him, but this will get popped in with it when it’s done:

Binary Cable Hat in progress

There’s another gift I’ve half-finished, but since the recipient sometimes read this blog, I won’t mention it 🙂 (But dear recipient, don’t get TOO excited. It’s just something I have owed you for …ahem ….a while. This year you might actually get it. Fingers crossed. But I have something else for you, as well!)

When those two things are done, then the next project will be finishing my All-Lace Brangian shawl, which is about half-done. I realised this morning that if I want to actually finish the Ravelry 10 Shawls in 2010 challenge, then I’m going to have to finish that shawl (my 1oth for the year) in the next week or so, in order to get it blocked, photographed, and uploaded to the group before I leave for hospital on the 10th Dec. It’s only a small shawl, so that should be doable.

And in pattern news, I have updated the Brangian Progressive Yarn Usage table, and added one for the All-Lace Brangian version, which has slightly different row counts and therefore yarn usage. They can both be downloaded as .pdf files from this page.

Christmas Lights Shawl Released

This afternoon, after checking over the pattern again, I created a pattern page on Ravelry for the Christmas Lights Shawl and made it available for sale. I’ve also updated my pattern section here, and added the pattern into the Yarnosophy shop, but I’m sure Ravelry will be the place that most people go! (Which is fine by me, as Jess & Casey have created such an amazing community there that I like to support them as much as possible.)

Here’s some of Tara’s photos of the sample shawls, taken at our photoshoot yesterday:
Christmas Lights Shawl - edge detail

Christmas Lights Shawl - detail

Christmas Lights Shawlette - shawlette size

Christmas Lights Shawl - medium size

So, after months of knitting and calculating and charting and drafting and checking and rechecking and knitting… it’s finally done and out there!

Photoshoot

The lovely Tara, her friend Bella and I went out to the pine forest just north of town this afternoon, with the two Christmas Lights shawls I’ve knitted. It was a very simple photoshoot – no crowds of makeup artists, photography assistants, or stylists – just the three of us, and the lovely quiet of the pine forest in the spring, with the birds singing in the trees and the grass green from recent rains.

Photographing Christmas Lights shawl

Isn’t Tara’s jumper great? One of her own knits, featuring her own handspun.

Once Tara’s had a chance to go through her photos, I’ll select which ones to use for the pattern and the associated Ravelry listing. So, we’re getting much, much, closer!

I’d really like to thank Tara and Bella for taking some time out today to help with this at short notice. There are many wonderful people in the world, and they are two of them!

Almost there

I’m getting much closer to releasing the Christmas Lights Shawl pattern. The fantastic group of test-knitters are making great progress, and have provided some valuable feedback on the pattern. I found a tech-editor n Ravelry who is seeking to build up her experience, and she’s done a great job, going through the pattern in detail, and making some thoughtful and sensible suggestions for improving it – and picking up a missed ‘yo’ in the instructions!

On Sunday, after a long day with much knitting, I finished the medium size version of the shawl, and managed to get it all pinned out on the blocking mats before taking the dog to the vet yesterday morning. It was a gorgeous, sunny day, and our sunroom where the shawl was pinned out was toasty cosy – great for drying a shawl! So late afternoon I was able to unpin it, and take a few photos – not that any of them are great! I really need a beautiful garden, and/or some attractive garden furniture, to photograph shawls – our straggly wild bushland just doesn’t have anywhere to drape things photogenically. But here it is, hanging on a wall:

Christmas Lights Shawl

Tomorrow my photographer friend and her model friend and I will head out to the pine forest to take the ‘official’ shawl photos for the pattern. Then I just have to rearrange the layout of the pattern to fit the photos in, do a final check… and then it can be released into the wilds of Ravelry!

Oh, and you might want some project details!
Pattern: Christmas Lights (of course!)
Yarn: Saffron Dyeworks Enya Sock yarn in Lt Lockwood; 2 skeins
Beads: 4.5mm silver-lined aquamarine seed beads from Empire Beads
Ravelry Project Page

Now that I’ve finished knitting Christmas Lights (at least for now), I’ve picked up my all-lace Brangian again. It’s nice easy knitting, in a pretty clematis blue-purple silk/merino. I’m also itching to cast on some more socks 🙂

Decisions

I’ve been making decisions lately.

I’d originally planned to call my new shawl design Aurora’s Light, but I kept looking at it:
Knitted shawl - Christmas Lights
… and the Christmas Trees under the Christmas Star pattern just kept leaping out at me, and I finally decided that it couldn’t really be called anything else but Christmas Lights.

The pattern is currently being tested by a small band of enthusiastic testers over on Ravelry. There’s still scope for a couple more testers, so if you’d like to join in, see the discussion thread on the Brangian KAL group – the important info about the pattern is in the first post.

In an earlier post, I mentioned starting another sample of the shawl in lovely silk/merino from Knitabulous in a colourway called Tequila Sunrise – gorgeous pink and peach colours. However, having changed the name, I’m decided to put that one aside for a while, and I’ve started another one, this time for the medium size in a great Christmas green yarn from Saffron Dyeworks:

Christmas Lights Shawl progress

I’m planning to use the Tequila Sunrise yarn for a different pattern, perhaps a new one that may even start with the star, but go quite differently from there…. I’m still thinking about that. And there’s plenty of time, because I have to knit the green Christmas Lights first!

The other decision-making currently occupying my mind relates to the cleaning out and tidying I’m doing in our sunroom. When we designed the house, the plan was that one end of the sunroom would be my craft/office space. However, in between the start of building on the house, and moving in, I acquired a large, 12-shaft countermarche loom – which does fit at the end of the room, but takes up rather a lot of it! I also resigned from my full-time job the week that we moved, back in 2001, and although I’ve had other jobs out at the uni since then, I no longer have an office out there to store all my work-related things. Now I’m working from home, on another career, and it brings its own stack of paperwork, resources, and books. I’ve got bookshelves overflowing in the guest room, and a tiny desk tucked into a corner there, and a stack of paperwork, books, and fibre/yarn things in the sunroom, which is also home to assorted other bits of furniture and aspects of our life – amongst other things, the washing is frequently hanging up to dry there! And for the past year or so, I’ve been basically working at the dining table, moving my laptop when we have guests.

I’ve advertised the large loom for sale a number of times over the past few years, with no luck. I’ve also got a smaller 4-shaft counterbalance loom, and I’d planned to keep it until I could replace both with a smaller 8-shaft loom. Then the thought finally occurred to me the other day – why not keep the large loom, which will weave just about anything I’ll ever want to weave, and sell the smaller loom? If I also find new homes for the rocking chair, the treadmill, & assorted boxes, I could put a desk/table in their place, and shelves/cupboards on the other side of the big loom, rather than trying to work at a desk crammed in there.

Maybe it’s because Spring is in the air, or maybe its just the right time to do it, but I’ve begun the task of decluttering so that I can rearrange things, and although it doesn’t look like it just yet, I have made significant progress! The major ‘if’ of the decision about the looms, though, is that I have to make sure that I can work comfortably at the large loom. In all the years I’ve had it, I’ve only woven about 4 warps on it; when I was trying to sell it I wasn’t weaving on it, but I’m itching to weave again and I’ll wind a warp soon and test out that it will be okay as my only loom. But first I’m going to make apron cloths for the front beams and double back beams, as it doesn’t have any and I’ve always thought it need them. I bought calico for that today… and excavated the sewing machine!

Although there is one decent-sized cupboard in the room, it’s not quite large enough for all my stash and paraphenalia, so I’ve been looking at storage cupboards this week, and think I’ve found a suitable one to put down one end of the room. I just have to decide what else will go into the not-much space between the loom and the wall, and how I’ll configure that. Oh, and how I’ll afford it, as well!

And on top of all those decisions, there are a hundred small ones, as I sort through paperwork and other things. I’ve emptied a filing cabinet, although there’s a pile of files that need to be kept; tax paperwork, and family ephemera such as pictures drawn by my niece and nephew when they were little. I’ve emptied a cane chest, and put an assortment of things into a box to go to the Salvation Army… but there’s a jumper I started making for my nephew, when he was 3-ish – it’s almost finished, but he’s now 16! And a lovely fair-isle cardigan, started 11 yeas ago – for my now 19 year old niece. I’m not sure if I’ll finish them, or pass them on to a knitter with small kids to finish. I did put the almost-finished lacy baby jacket and pattern into the Salvos box – hopefully it will find its way to a knitter who likes baby things. I’ve managed to be firm with decisions about some spinning fibre; bits and pieces of fleece and natural roving are going into my compost bin or will become mulch in the garden. I’ve still got a box and a bag or three of lovely fibres, but the older, not-special fibres are going out.

There’s still a way to go until it’s all sorted, but I’m feeling good about progress, and looking forward to eventually having my own space again.

A round of updates

I’ve been busy with updating and rearranging things, here and there.

I’ve updated the Brangian pattern. There were no errors in the previous version, but the new version has a better (I hope!) layout, and also includes information about varying the pattern, including instructions for the All-Lace version. Here’s my All-Lace one underway:
Brangian Shawl, All Lace version

The updated pattern has been uploaded to Ravelry and to the Yarnosophy shop, and I’ve let Ravelry buyers know to download the new version. I’ll be emailing those who have bought the pattern through Yarnosophy shortly.

I’ve also been doing some updating and reorganising in the Yarnosophy shop. I’ve set up a number of categories for the stitch markers, so it will be easier for people to find the size and style (rings or loops) that they prefer. I’ve also changed the default currency setting to Australian dollars; I originally had it set as US dollars, as I advertise on Ravelry and I know that some US people find non-US currencies discouraging, but as most of my buying customers are from Australia, (the postage costs tend to be off-putting for overseas buyers) it makes more sense to use $AUD. So that’s all now changed over!

I’m also doing an inventory check, and improving my own behind-the-scenes system. It’s not been pretty good and I’m happy with the way they’re packaged, but I’m going through and adding a label to each set of markers with all the pertinent info including the name they’re listed under, needle size, and price code, and cross-checking that with what’s listed – early on, I underestimated the needle sizes that the tigertail loop ones would fit, so I’m updating all of those. This will make it easier for people who buy offline to look through the box and have the info to hand, and also for me to quickly find the right markers when people buy them through the shop. It all takes time, of course! However, now that I’ve refined the packaging/system/shop catalogue, it will be easier for everyone, including me!

I’ve found a good source of closed rings, so I’ve been making some markers with rings rather than loops – but I still use the tigertail to attach the beads. As there’s no wrapped wire, they’re also snag free. The rings only come in two sizes, so I’m making small markers which fit up to size 3.75mm needles, and medium ones which fit up to 5.5mm needles.

The small ones I’ve made with 6mm pearls are perfect for lace or baby knitting – and I think they’re very sweet!
Small stitch markers

They’re now in the shop, and I’ll have some more medium ring stitch markers in there in the next few days – I’ve got a few made already, but they have to be photographed and entered, which all takes time.

When I’m not updating patterns, making stitch markers, or playing shop keeper and tidying up the stock, I’m knitting while I stare at the screen and trying to write. I’ve started another sample for the new pattern, Aurora’s Light. I’ve still got a few more hours of work on it before the pattern is ready for testing, but hopefully I’ll squeeze that in in the next week or so. Here’s what I’ve knitted so far – the yarn is some of Knitabulous’ fifty-fifty merino/silk fingering. The yarn colour, Tequila Sunrise, is perfect for Aurora’s Light!

Aurora's Light shawl in progress

But right now, I’m going to get back to writing the next book!

Aurora’s Light?

Thank you to everyone who has made suggestions for the name for the new shawl. I’ve been looking up goddesses and heroines of legend, trying to find one connected with the sun, stars, or dawn – one with an easy to spell, and pretty name!

I think I’ve decided on Aurora. In Roman mythology, she is the Goddess of Dawn, and I think the shawl design can be seen to have dawn spreading over forests and streams… However, as there are multiple shawls and other items called ‘Aurora’ on Ravelry, the name needs something extra – so how does Aurora’s Light sound?

And here she is, in the shawlette size:
Aurora's Light Shawlette

I hope to get some better photos soon, but it was a grey, wet day today, so not much photography was happening!

Now I just have to finish writing up the pattern, send it out to testers, and finish knitting a shawl-size one. In all that spare time I have….

Beautiful blues

It’s been a busy few weeks! So, what’s been happening?

The weekend before last, Emily (Rav link) and I set up a couple of indigo dye vats, and had a great afternoon gently dunking yarn, fibre and fabric into them, and watching the magic results as we took the dyed items from the vat, and on exposure to the air they gradually changed from green through lovely blue-green shades to blue. I didn’t dye a lot (I didn’t have a lot prepared), but now I know the process, I’m planning to do it again, very soon. Maybe even tomorrow. I want to re-dip a couple of the skeins I dyed, to get a deeper blue. Plus dye some more things!

It’s impossible to photograph things when you have blue-stained rubber gloves on, but fortunately Tara was there, too, and very handy with her camera. She’s put a set of photos from the day on Flickr.

A couple of days after the indigo-dyeing, I headed down to Sydney for the Romance Writers of Australia conference at Coogee. Very little in the way of knitting was achieved while I was away, other than a handful of rows on a present (now late) for my nephews birthday. More on that when it’s finished! But the conference was, as usual, fantastic, and I’m all energised and motivated to get really cracking with the new book. Although textile work is rewarding, it doesn’t pay the bills, so I’m going to have to put my writing work (mostly) first for a while.

However, now that I’m home again, I did finally take some time today to block the shawlette that I finished knitting two weeks ago. It’s the second prototype for my new design. I’m mostly happy with it, but in the final pattern I will make the ends of the spines deeper and more pointy over a few more rows, taking them down towards/into the border pattern.

Blue shawlette blocking

Knitted shawl - bead detail

The charts are all done; I ‘just’ have to finish the general instructions and do the written lace instructions for those who don’t like charts.

Oh, and come up with a name for her!!